NotebookLM: The Language Professional’s Secret Weapon for Conquering Information Overload
Ever feel like you’re buried under a mountain of project materials? Managing all those scattered reference docs isn’t always easy. And when you’re pressed for time, making sense of information from multiple sources can feel overwhelming.
That’s where NotebookLM, Google’s new AI-powered assistant, comes in. With NotebookLM, you can easily gather all your project materials in one place and use AI to quickly pull out the insights you need, right when you need them.
In this article, we’ll show you how to use NotebookLM to organize, process, and analyze a collection of documents so you can prep smarter for your next translation or interpreting assignment.
What is NotebookLM?
Imagine a smart AI assistant that scans your project documents and pulls out all the key info in seconds… without hallucinating! That's Google's NotebookLM.
Unlike other AI tools that pull from the internet or broad data models, NotebookLM works exclusively with the files you upload – your trusted sources. And here’s the real game-changer: instead of processing files one by one, NotebookLM lets you query up to 50 files at once!
Once you upload your sources, you can ask questions and connect the dots across them. You can also create useful content from them, like FAQs, a study guide, and even an audio overview (more on that below!). Essentially, NotebookLM helps you turn dispersed, raw information into organized, actionable knowledge – which comes in handy for translation and interpreting work.
How NotebookLM works
NotebookLM allows language professionals to create, organize, and manage multiple notebooks for various projects.
Adding a file (or “source”) to NotebookLM automatically creates a notebook – a dedicated space for your project materials, similar to a folder but with much more power. You can create up to 100 notebooks, each a distinct knowledge hub for specific projects or topics.
But bringing all your project information into one place is just the starting point for a deep dive into your sources. NotebookLM’s AI lets you explore them in infinite ways, helping you uncover insights and connections that might have been hard to spot otherwise.
Confidentiality in NotebookLM
While Google claims that NotebookLM doesn’t use personal data to train its models, it does say that human reviewers may review queries, uploads, and responses to improve the service.
If you’re using a regular Google account (not a Google Workspace or Google Workspace for Education account), it’s best to avoid submitting sensitive or confidential materials, just to be safe. And, of course, steer clear of uploading copyrighted content.
Note: NotebookLM’s privacy policy is specific to this tool and doesn’t apply to other Google products, like Gemini. (Learn more about keeping your data safe in the age of AI.)
Get started with NotebookLM
Simply log in to your Google account (or create one), then head tohttps://notebooklm.google.com.
Want to use NotebookLM in a language other than English? NotebookLM currently supports 35 languages – just add the language code at the end of the URL (like “es” for Spanish): https://notebooklm.google.com/?hl=es.
(Thanks to techforword insider Daiana Kaczuba for this tip!)
Create a notebook
NotebookLM supports PDF, .txt, Markdown, and audio files – just drag and drop, or click “choose file” to upload one or more sources.
Upload PDFs, text, or links to NotebookLM and let AI analyze your research efficiently.
You can also pull files directly from Google Drive, type in a website or YouTube link, or even copy and paste text. You can add up to 50 sources, with 500,000 words (or up to 200MB) each. Keep an eye on the Source Limit bar at the bottom of the screen; it’ll let you know when you’re nearing capacity.
When you upload a file, it shows up under Sources on the left side of your screen. To hide the sources panel, tap the hamburger menu (the triple bar) in the top right corner.
Note: When you import a Google Doc or Slides presentation, NotebookLM creates a snapshot of the document at that time. Later changes in Google Docs or Slides won’t sync automatically. For the latest version, just click Sync with Drive in the source viewer.
Get a summary and key topics for each source
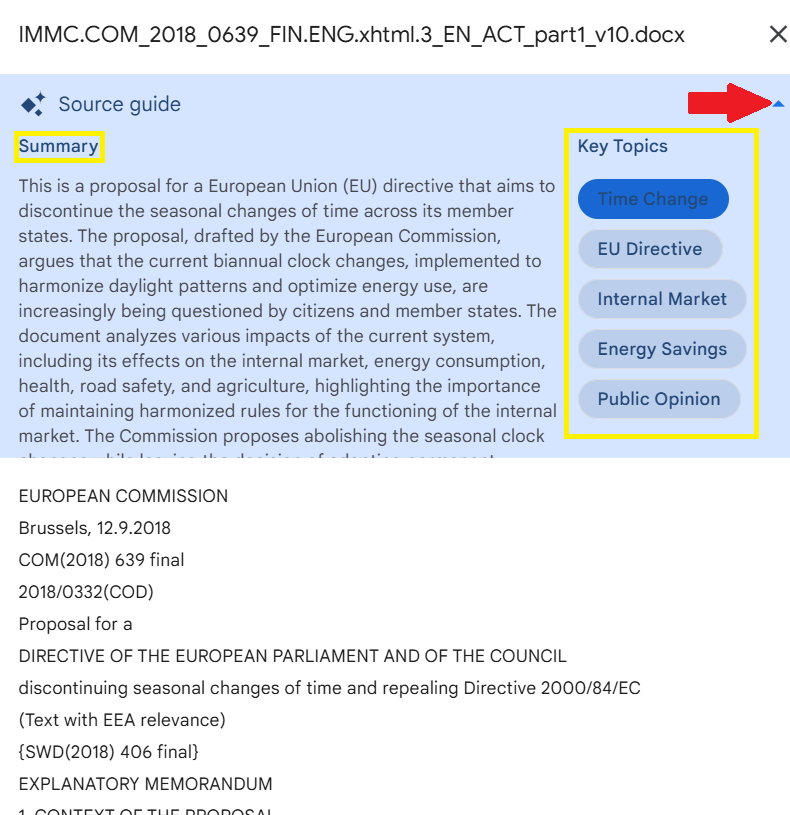
Use the Source guide to get a summary and a list of central themes within a source. To open it, simply click on your source. Then, click any Key Topic to learn more about it. This prompts NotebookLM’s AI to generate an explainer text, complete with citations. You can save that response as a note and/or continue the conversation.
Quickly identify key topics within your sources using NotebookLM’s source guide
You can also click the caret in the upper right corner to hide the Source guide.
While reading your document, you can highlight passages and pick from a number of suggested actions. For example, you can save the highlighted passage as a note (see below), ask the AI for clarification (“Help me understand”) or request a summary (“Summarize to note”).
Interact with AI to summarize research, extract insights, and extract key takeaways as notes with NotebookLM.
Save highlighted text and AI-generated insights
NotebookLM offers three ways to create notes: you can write a note, save an AI response as a note, or select multiple notes to auto-generate new content (like a study guide).
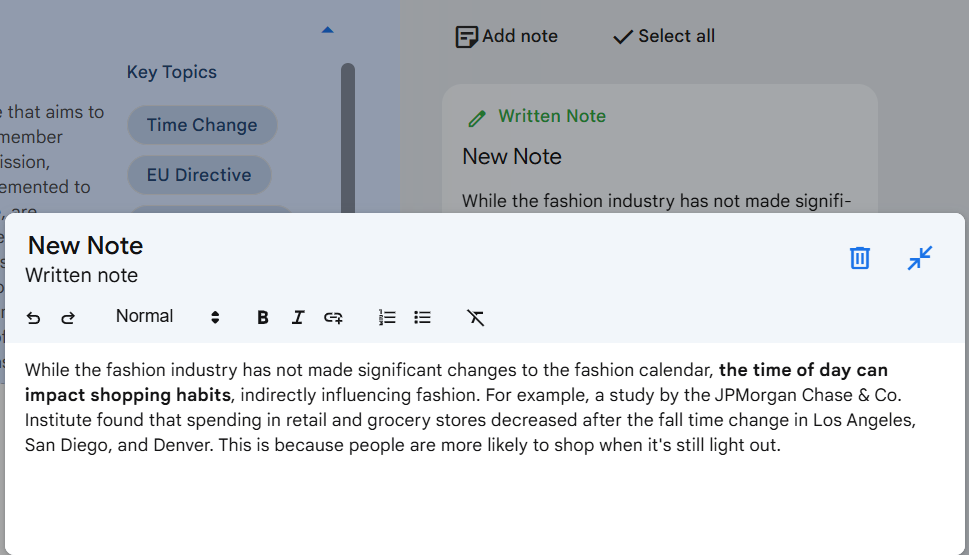
To add a written note, click “Add Note” in the top left corner of the Noteboard. A text editor will open where you can type, paste, and format text. When you’re finished, click outside the editor to automatically save your note to the Noteboard.
Effortlessly add, save, and refine research notes with NotebookLM’s AI-powered note feature.
To save a quote or passage as a note, highlight the text and click “Add to note” at the bottom of the screen, just above the chat box.
Quickly extract key points from research sources with NotebookLM’s “Add to Note” feature.
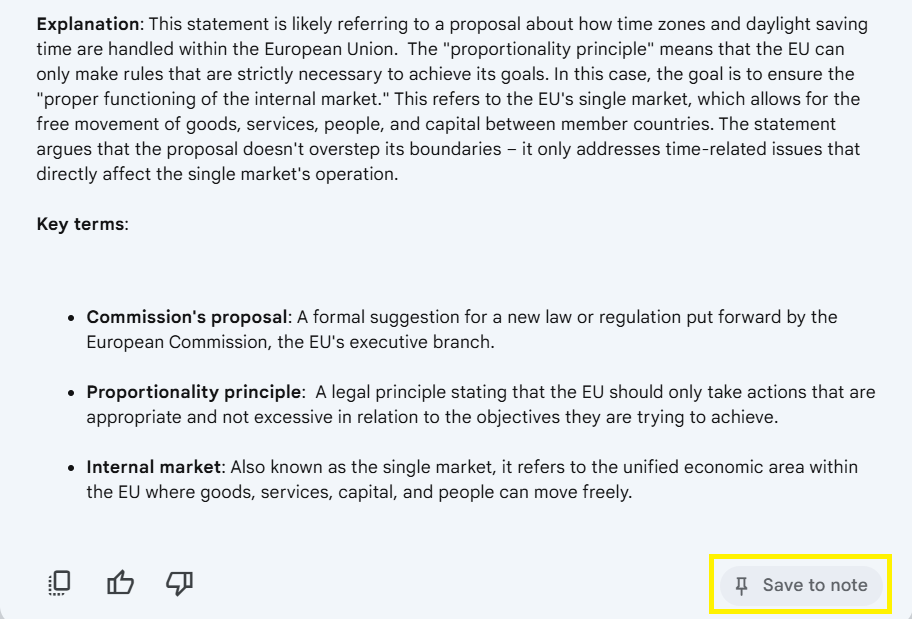
You can also ask the AI to summarize or explain a highlighted section and save that response as a note. Just click “Save to note” in the bottom right corner of the chat response.
NotebookLM’s “Save to note” function helps you capture essential information with one click.
Note: Notes aren’t the same as sources. Sources are your reference documents,and notes are like post-its: A place to add information that’s not in your sources or key details you want to remember.
Add more documents without leaving your notebook
To add more sources, click the plus sign. When working with multiple sources, you can select or deselect sources to narrow or broaden the scope of your query.
Select and manage multiple sources within NotebookLM
Create unique new content from your sources
Once you’ve uploaded multiple sources, NotebookLM creates a Notebook guide with a brief Summary and three Suggested questions related to your collection.
It also lets you generate new content based on your source materials, including a FAQ, briefing doc, timeline, table of contents, study guide, and audio overview.
Get AI-generated summaries, FAQs, and insights to enhance your research with NotebookLM.
Click any of the Suggested questions to get a thorough response from the AI, complete with citations (see numbers). Click the numbers to see the exact quote in the original document.
Click citation numbers in NotebookLM’s AI-generated responses to view exact quotes from the original source.
Note: The Source guide helps you understand a single source, while the Notebook guide helps you make sense of multiple sources within your notebook.
Use NotebookLM’s pre-formatted guides to help you prepare for your next translation or interpreting assignment.
For example, you can generate a Table of contents to get a summary of all your sources – a great starting point for making sense of your reference materials. Create a Briefing doc to get a summary in outline form. A Timeline may be useful for some topics, and a list of FAQs is a great way to test your understanding.
One of NotebookLM’s neatest content types is an audio conversation about your sources – a podcast, basically – for learning about your topic on the go. Simply go to Audio Overview and click “Generate” to create a general dialogue or “Customize” for a more targeted conversation. Google claims their Deep Dive podcasts only support English, but you can click “Customize” and prompt the AI to only use another language to “trick” it into generating a podcast in that language.
Find answers fast by “chatting” with your documents
To “chat” with your documents, simply type a question into the chat box at the bottom of your screen. This is an easy way to find specific information within your documents, and it can be a life-saver when you need an answer fast – for example, during simultaneous interpretation.
You can also use the chat function to extract key terms or acronyms from documents. For better results, make your prompts as specific as possible. Instead of simply asking for terms related to a topic, for example, try asking for “ten multi-word scientific terms.”
Don’t be afraid to ask for exactly what you need, just how you need it. For example: “List 20 legal terms related to reputation in the context of trademarks, and tell me what they mean. Present your response as a table.”
💡 Pro Tip: To get accurate translations for terms, upload documents in multiple languages, then use this prompt: “Provide [language] translations. ONLY provide [language] translations FROM THE DOCUMENTS.”
Remember, you can save all these AI-generated responses as notes, although they may not preserve their original formatting.
Try this amazing tool for document collections
NotebookLM is incredibly useful for making sense of information across multiple – and multiple types – of documents. But it’s just a tool – one more to add to your research toolkit. Use it in your preparation to get a good overview of a certain field of knowledge, or during an assignment, to drill down on a specific topic or quickly find information. And remember: the quality of what you upload to NotebookLM matters – you need good source documents to get good results.


